Tuesday, December 13, 2011

Playing with a lightbox

I've been avoiding taking and posting pictures of my recent FO's because  like most people I don't the room to set up a regular photo area.  Usually I take pictures in my dining room which is not only the place where we eat, but also were the kids do homework, where my husband works on his computer, where things get put when nobody knows what to do with them...well you get the idea.  So it can be very time consuming to set up the make-shift studio (an old sheet and some desk lamps) in my dining room to take a few pictures.

I've been looking for a solution for a while and I think I found the answer (for small projects anyway) in the form of a homemade light box.  It's nothing fancy, but what can you expect for something that cost me less than $5 to make and the best part is it really seems to work.  

I had been thinking about a getting a light box since I first heard of them a couple years ago and even found instructions on how to make one, but never got around to doing it.  It wasn't until recently when I tried to take some quick pictures in the dining room and they turned out awful that I finally got the ambition I needed to try making one.  I won't bore you with the details, because the web is full of how to's, just google search homemade light box and you'll find all kinds.

I was surprised how nice my photos turned out with the box and I hardly have to do any editing. 
Light box shot with direct light & no flash.  To yellow

Dinning room shot, ceiling lighting & no background 

Light box shot, with flash.  To washed out
Final light box shot, no flash, diffused side lights.  Truer colors.


I really like white background photos, but have a hard time producing them myself.  I usually end up with something like these.
Invisible mannequin
Washed out mannequin

 After playing around with the white balance I was able to achieve the effect I was looking for without a vanishing or washing out the mannequin head.

Most of the blogs I read, suggest you use daylight bulbs for lighting, I bought daylight bulbs, but all the photos above were taken with regular soft white 65watt bulbs. I'm waiting to use the new bulbs until I can buy myself some lamps, so I don't have to steal the kid's desk lamps and change all the bulbs every time I want to take some pictures.  Now if I could just figure out how to light larger objects to get the same results, I could take the kid's portraits.

Monday, November 21, 2011

Hats for Girl Scouts

I've been busy this last week knitting for Girl Scouts.  These are hats I made with leftover or unwanted for my daughter's troop to sell at their Tot Shop on Dec 3.  I have one still on the needles and enough yarn for another.  Hopefully I can get the last two finished before the sale.

Monday, November 14, 2011

Stashbuster

My yarn stash has been of a thing of contention for me for a long time.  I vowed several years ago to use up what I had before I would buy anymore.  That only worked if I wasn't picky about what yarn I wanted to use for new projects.  Over the last couple years I've been able to dwindle my stash down by donating skeins, or deciding that 1/2 a ball of Red Heart really wasn't worth keeping.  I'm down to my last 5 skeins of nicer cheap acrylic yarn.  I've kept them because I liked them when I bought them and always thought I'd do something with them, but they've been sitting in my stash for quite some time.

My daughter's girl scout troop is hosting a Holiday Tot Shop, where little kids can come and buy presents for Mom & Dad.  So I thought what better way to get rid of my yarn than knitting hats for the sale and what doesn't sell will be donated to charity.  And then I'll finally be able to buy new yarn with out the quilt.

Tuesday, August 16, 2011

Introducing my first pattern for sale


Tutu Tank Top
A cute toddler's tank top with a little bit of a ruffled hem.  Pattern available in sizes 24 months to 4T.  Available for purchase on Ravelry for $6.00.
Sample was knit with Corny Goodness dk in 4T.

Don't know how to knit?  I can knit it for you.  Contact me for more information.

Wednesday, July 13, 2011

Test knitter wanted

I think I have the pattern finalized for the Diamond Brocade toddler sweater, but before I publish it, I really want to have somebody else test it out.  It's written in sizes 18/24 mos. to 4T.  If anyone is interested, leave a comment and we can work something out.

Sunday, July 10, 2011

Sneak peak at a new pattern

I've been knitting alot lately, so much so that my hands are starting to hurt.  I think I better take that as a sign to lay off of it for a while.

Diamond Brocade Toddler Sweater


I've been working on a new pattern.  This drop shoulder sweater features an expanded neckline by shoulder fastening, a diamond brocade design on the body with a little bit of diamond brocade on the sleeve too.  Right now I only have the pattern written for 18-24 months, but I'm working on making it multiple sizes.  When done, the pattern will be available for sale in the shop.

Baldwin the Bathroom Monster


The other week I was at the craft store, picking up more yarn when I ran across  Rebecca Danger's The Big Book of Knitted Monsters.  Paging through it, I thought what a perfect way to use up all my left overs or single odd skein.  The projects are fairly simple and knit up fast.  I was able to knit Baldwin on a 5 hour car trip.  I have more left over yarn to use up, so I'll be making more in the near future and donating them to a local children's charity.

Friday, June 24, 2011

Vine Lace Beanie pattern

I tried to make this pattern a PDF file, but here it is in case you can't access it.


 Vine Lace Beanie

Brenda Hoffman

Gauge: About 20 sts/4 inches     Vanna’s Choice WW Yarn
Needles:  #7 & #8 16” circular needles
With a #7 needle cast on 88 sts.  Place marker to indicate beginning and work k2, p2 rib for 12 rows or 1 ½ inches.
Increase round as followed
With #8 needle, work 43, kfb, work 43, kfb  (90 sts)

Start lace pattern, starting with row 2

Lace Pattern (multiple of 9)

Row1: k                                                                                                  
Row 2: *yo, k2, skp, k2tog, k2, yo, k1 rep from * to end
Row 3: K
Row 4:*k1, yo, k2, skp, k2tog, k2, yo rep from * to end
Repeat these 4 rounds, until hat measures 6 inches
Crown
On the next round (work 43 sts, k2tog) 2 times. [88 sts]
Work one round even.
Shape crown as described below.
Round 1: *Work 6, k2tog. Repeat from * around. [77 sts remain]
Round 2 and all even rows: K
Round 3: *Work 5, k2tog. Repeat from * around. [66 sts remain]
Round 5: *Work 4, k2tog. Repeat from * around. [55 sts remain]
Round 7: *Work 3, k2tog. Repeat from * around. [44 sts remain]
Round 9: *Work 2, k2tog. Repeat from * around. [33 sts remain]
Round 11: *Work 1, k2tog. Repeat from * around. [22 sts remain]
Round 13: *K2tog. Repeat from * around. [11 sts remain]

Finishing
Cut yarn, a generous tail. Draw tail through remaining stitches on the needle. Pull gently to close hole. Weave in tail.
Weave in ends.


Finished projects and a free pattern

I finally finished the vest I've been working on for quite a while.  I was planning on offering the pattern for sale, but as I worked on it I made changes here and there and never bothered to write them down.  And once it was done I wasn't to thrilled with it.  Don't get me wrong, it looks fine, there's just something about it that I don't like.  I'm going to try it again with a couple revisions in mind and a different yarn.  Maybe those changes will be enough to make me change my mind.


On another note, I do have a pattern to offer.  This beanie is the result of playing around.  My daughter loved the pattern and requested a hat.  Since then I've gotten couple requests for the pattern and decided to offer it here for free.  I'm working on matching fingerless gloves, if I can figure out how to do the thumbs without messing up the pattern.

Sunday, May 29, 2011

Gauge issues

Measuring my gauge has always been one of my biggest stumbling blocks when it comes to knitting.  And this project is no different.  I knit a swatch and carefully counted my stitches and rows and came up with 6.5 stitches & 8 rows/inch.  Using these numbers, I figured I needed  234 stitches to make a 36 inch wide piece.  It wasn't my math that was off, it was my gauge.  Turns out my gauge was more like 6 stitches/inch, so right from the beginning I inadvertently added extra inches.  So now the garment I meant to make as a small is more a medium or even a large.

Since this pattern is still a work in progress, I'm going to finish it as is and see how it turns out.  Knowing what I know now, I'll be able to make the necessary adjustments to make the next one the size I intend.

Thursday, May 19, 2011

Scary lace

I've avoided lace patterns up until now, because I was scared they were to complicated and to difficult to keep track of the stitches.  The last time I attempted lace was when I was just learning to knit and picked a pattern that was way over my head.  The last couple of months I've been browsing through my stitch dictionary longing to do something other than basic cables and ribs.

I chose horseshoe lace for this project because it looked to be one of the easier ones.  I already knew how to do all the stitches.  It was just a matter of putting them in proper sequence; which wasn't as easy and it seemed.  I can't tell you how many times I started out, sure I was following the pattern, but by the time I got to the end of the row, something was off.  I either had to many stitches or not enough, throwing off the rest of the pattern.  It wasn't until I realized I could use stitch markers at the end of each repeat to keep track of where I was.  Now even though I have 200+ stitches in a row, they just seem to fly by and I've finally gotten to the point where I've started to memorize the pattern.  I'm finding lace really isn't as scary as I thought.

Sunday, May 15, 2011

Sneak peek at my next project

Here a little sneak peek at what I'm doing next.  This is yarn I bought last weekend at  Interlacements booth at the Shepard's Harvest Festival.  This is the thinnest yarn I've ever used and I haven't had much luck with lace patterns before so this is definitely a challenge.  I'm in the process of designing something and everything goes well, I'll be publishing the pattern for sale in the shop.

Sunday, May 8, 2011

Shepherds Harvest Festival

I spent my Mother's Day wandering around the Shepherds Harvest Festival in Lake Elmo, Minnesota.  This was my first visit there and it was a lot of fun.  There were many yarn vendors with beautiful yarns and I discovered corn yarn.  A yarn with the look and feel of cotton, but made from corn.  There were sheep sheering demos, spinning demos, stock dog demos (sheep herding), and others that we didn't get to.  We walked around the barns, looking at alpacas, llamas, sheep, goats and rabbits.

One of the fiber rabbits.  This one was huge.
Sheep sheering demo

Fleece skirting


Just one of the spinners


A baby lamb wearing a sweater
Llamas

My daughter riding a llama

Thursday, May 5, 2011

On the blocking table

This sweater started out as a shrug I knitted last summer.  I only wore it about 3 times and then put it away, because I really didn't like it.   This winter I decided to frog the shrug and knit something I've been thinking about for a while.  I knit this this pattern for my daughter a couple years ago.  Hers was knit in acrylic for easy care, but this one is 100% highland wool, and has me a little nervous.  I don't usually work with wool and I've never hand washed anything before.  I tried very hard to avoid stretching, but somehow it looks like it's gotten wider.  I'm hoping it will be ok.  I hate to think of all the work I put into it and then not have it fit.  I still have to find a button, I'm thinking of hitting the antique stores for something unique.

~Edited to add that I was able to put it in the dryer for about 20 minutes on delicate and get it shrink back down to size.

Monday, April 18, 2011

No-sew method for adding a decorative edge to your projects

Decorative edge knit onto a blanket.  WIP
I hate seaming… So much so that I avoid it whenever possible. When knitting blankets or something that requires some sort of finished edge, I usually try to incorporate the edging or border into my pattern, but that’s not always possible. This particular blanket it wasn’t possible and I really debated whether or not to but a border on it. I put it away for a while and finally decided it needed something.

First I thought about picking up the stitches all the way around and knitting a simple garter stitch border, but really I wanted something a little fancier than that. I looked through my stitch dictionary and found a border I really liked, but it would need to be seamed on. What I wanted to be able to do, was knit the border and attach it to the blanket at the same time.

I spent the better part of a day searching online for directions on how to do just that, but came up with nothing. I knew there had to be a way and if I couldn’t find it online, I’d have to come up with a solution on my own. I played around with different ideas and finally found one that works.

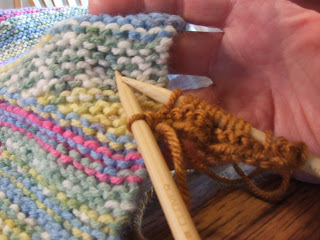
  • Pick your border pattern, and cast on desired number of stitches on a DPN. My border was originally 4 stitches wide, but I added 10 more stitches to make it a little wider. I placed a stitch marker between the 4 edge stitches and the 10 I added so I could keep track of when to start knitting in pattern.
  • Remove the last cast on stitch but keep it live, insert needle, from the wrong side of the blanket, into an edge stitch, place live cast on stitch back on needle.
Cast on needle with the picked up blanket stitch


  • Pass the blanket stitch over, and knit your first row, away from blanket edge
  • Turn your work, blanket and all and knit back towards the blanket until you come to the last stich

  • Pick up the next blanket edge stitch, knit the last stitch, pass the blanket stitch over
Picking up next blanket stitch

  • Turn your work, knit away and repeat.  
Depending on the size of your blanket, it could take a while to knit the border all the way around, but your omitting the seaming and you’ll know exactly when to stop knitting when the ends meet. The only seaming you’ll need to do is the two ends together with the method of your choice.  Weave in tails.